The 911 Carburetor
Porsche has used many different carburetors over the years leading up to the 911 series cars, in its day the carburetor was a reasonable efficient and inexpensive way to deliver and meter fuel to the engine. Porsche first used the Solex p40-I spill tube carburetor in the 1964-66 models then moving into the Weber IDA 3series carburetors and then finishing off with the Zenith 40TIN carburetors in the 1971-72 911T models. Though all 3 styles of carburetors look different they are still just a way of combining the incoming air and mixing it with the correct amount of fuel at the right time so that the engine can effectively burn the fuel and air charge.
Since fuel injection has replaced the carburetor in almost every vehicle the art of tuning and diagnosing a Carburetored vehicle is fast disappearing. To effectively diagnose a problem you must first understand what is happening in the carburetor when you drive. Starting with the engine warmed up and idling we have air flowing into the engine though the carburetor, past the small opening on the throttle plate, drawing fuel out of the idle mixture needle port and into to the engine. As we put our foot onto the gas pedal to increase the engine speed two things happen, first the accelerator pump system discharges fuel into the carburetor to make up for the delay in progression circuit activation, secondly as
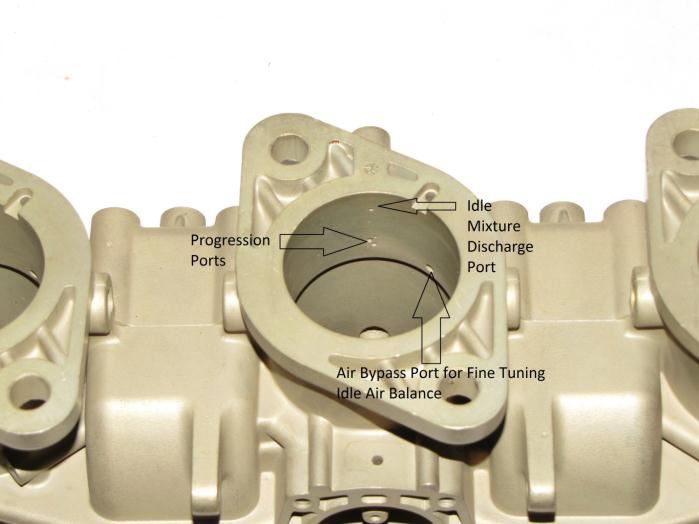
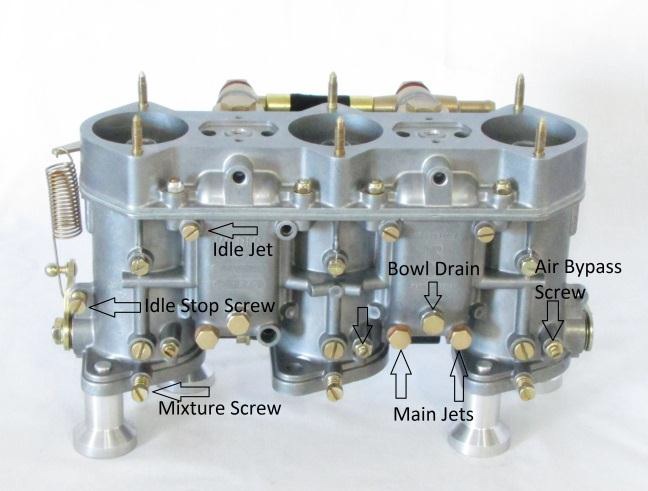
the throttle opens it uncovers the progression ports in the carburetor body. Fuel flowing out of these ports is governed by the idle jet size as well as the size and placement of the progression ports. As the throttle opens further, the air speed through the carburetor increases activating the main circuit and allowing fuel to flow though the auxiliary booster into the engine to be consumed with the air charge. The timing and the metering of the main circuit is controlled by several items. The Venturi / choke, controls when the main circuit will activate by changing the air speed though the auxiliary booster, the bigger the Venturi the slower the air speed at low engine speeds. The main jet, air corrector and emulsion tube control how much fuel and air mixture is allowed to flow into the auxiliary booster.
Although a very brief overview of how the carburetor works now we can get an idea of what is happening when a problem arises. As a cautionary note the carburetor is the last item we touch when tuning an engine, the internal components of the engine must be in perfect order, cylinder leak down values no higher than 20%, valve clearances adjusted correctly,
cylinder heads torqued, ignition system in perfect condition and ignition timing correctly set. Often problems blamed on the carburetor system are caused by the ignition system or engine components being worn, so make the time to make sure everything is right before touching the carburetors. If you are working on a stock vehicle then Porsche has already done all the hard work for you in figuring out the correct calibration package. A calibration package allows us to start and drive in a number of different driving conditions and speeds and will deliver the correct amount of fuel to fit the engine needs. When tuning our carburetors we should only be making minor changes in balance and fuel mixture settings. However from time to time things don’t do what they are supposed to do and we often have to do a lot more to keep the car running.
The first thing to do when you notice a problem is to think what has changed? If the car is daily driver did it change with a recent refueling? Or has the car been sitting for some time and you are just now putting the car back into service? What is and when does the problem occur? For example the car runs strong when we are on the gas at freeway speeds, but when we slow down to a stop the car shakes and wants to stall, when we rev the engine it responds well but still wants to stall at idle. From this we know that the main circuit is most likely working correctly, along with the accelerator pump circuit, so that leaves us with two options either the idle circuit is defective in some way or the engine is flooding due to a needle and seat failure or a fuel pressure problem. Knowing the basics of the carburetor allows us to go straight to the problem area; we can look down the carburetors with the engine running and physically see if fuel is running into the carburetor due to a needle and seat failure. By eliminating one possible problem we can now focus on the idle system.
For a vehicle that is in good condition and driven on a semi regular basis most carburetor repairs can be done on the vehicle without much effort. From time to time containment’s can make it past the filters and make it into the carburetors, simply removing the jets and blowing through them with compressed air can solve many problems. For our stalling and rough idle problem this is where I would start, First check for a mixture response by slowly turning the idle mixture screws in and out one at a time. When turning the mixture screw in you are leaning out the fuel mixture and the engine should slow down, when reversing the screw out you are increasing the fuel and the engine speed should pick up when coming from a lean condition. If there is no change in engine speed, either rich on lean, on a particular barrel then I would start by removing the idle jet and mixture screw for that cylinder and carefully blow compressed air though the jet as well as the passage way to clear any potential blockages. Then re-install the jet and mixture screw and see if the problem has been solved.
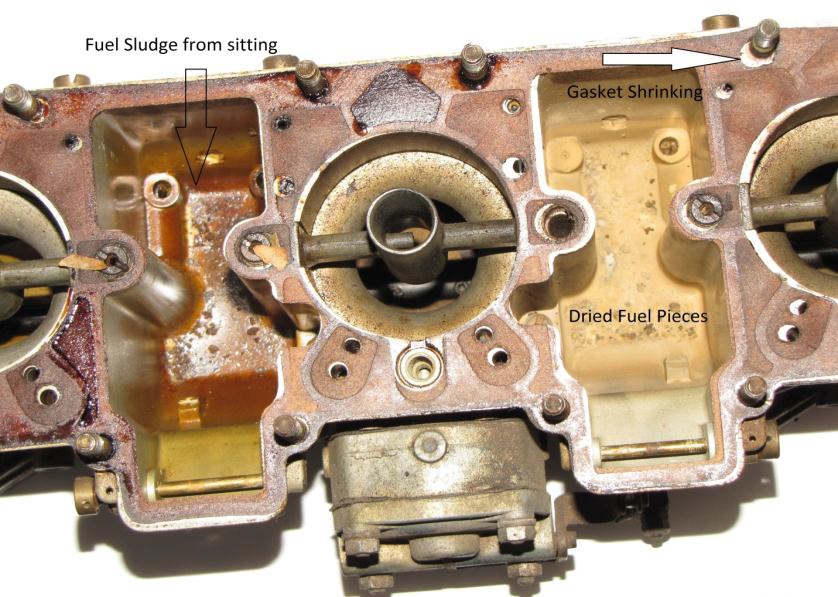
For a car that has been restored or is a well maintained daily driver this method of dealing with problems that arise in the running condition is fine and most problems can be easily solved without a major overhaul. However if you vehicle has been left sitting for many years or is a high mileage low maintained vehicle there can be other conditions that will require much more attention. Usually when we park a vehicle most people don’t intend it to sit for long, but before you know it the weeks turn into months and the next thing you know three years later the car won’t start. Now in a perfect world we would have completely filled the gas tank and loaded it with fuel stabilizer and then drained the carburetors, but it’s not a perfect world. When fuel sits in a carburetor it begins to evaporate away and break down into its base components, the fuel will first turn into sludge and then into a flakey dried up mess. Secondly depending on where the vehicle is stored water can also enter the fuel system leading to corrosion and further build ups of debris. This will happen not only in the fuel bowls but anywhere fuel has been left, accelerator pump and passageways, main jet wells, as well as the fuel tank and lines.
The only way to fix the storage problem is to remove and completely dis-assemble the carburetors for cleaning and inspection. At this time everything needs to come out of the carburetor, the fuel passages need to be rodded to ensure that there are no restrictions or debris left in the carburetor. Often standard shop cleaning practices are not enough to repair this kind or damage; we use a combination of cleaning methods to completely clear out the carburetor bodies
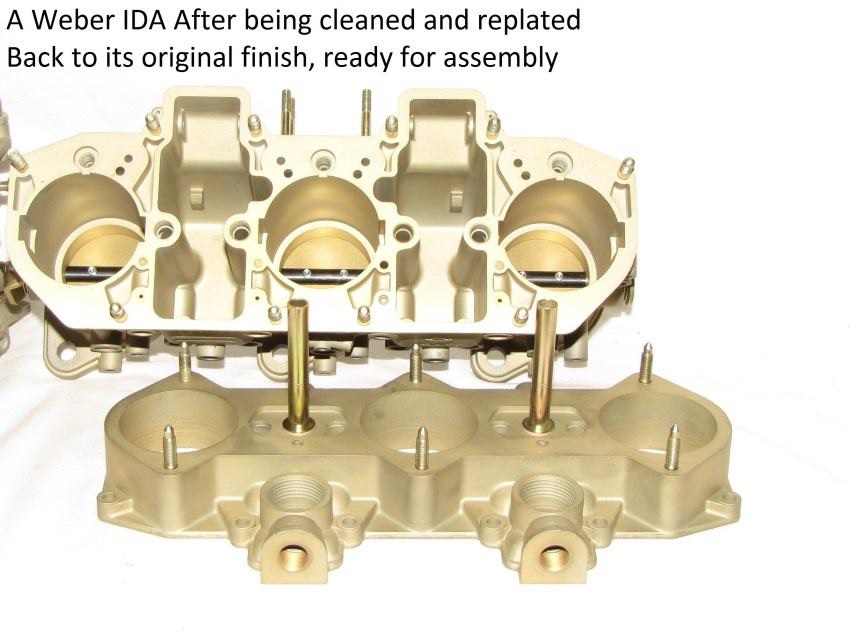
and passageways. We start with an initial wash though our hot wash machine to remove the big chucks and degrease the carburetor, next it goes through a soda blast operation to physically remove the debris and staining from the carburetor, then it’s back into the Hot wash to remove any remnants of the blast media and then finally it goes into our tumble machine where it is tumble against a ceramic media and a soap solution. This final process allows us to close the pores on the metal that have been opened by the blasting as well as restoring the appearance of the carburetor
After the cleaning process has been completed all of the passage ways and ports are physically checked by pushing though a cleaning brush and compressed air though the passage way as well taking a look with a flash light, before all blanking plugs are re-installed. This is also the time to inspect all of the major components for wear, we can clean and measure the throttle shafts and the throttle shaft bushings, replacing as required. As a side note throttle shafts and bushing cannot be too tight, they are not designed to be an air or fuel tight seal and there must be room for expansion due to heat and dis-similar metals. We have seen a number of carburetors that have been re-built with new bushing and shafts re-shimmed to remove an end float, and they work great on the bench but heat them up to 130 °F and next thing you know you have a throttle that sticks when the engine warms up. This is also the time to inspect the sides of the throttle plates for wear that will allow air to bypass the throttle causing un- metered air to enter the engine. We also take this opportunity to resurface all of the gasket surfaces back to flat ensuring a good gasket seal, we also re-plate the hardware. This is not only to make the carburetor look good but extends the life of the carburetor by protecting it from corrosion.
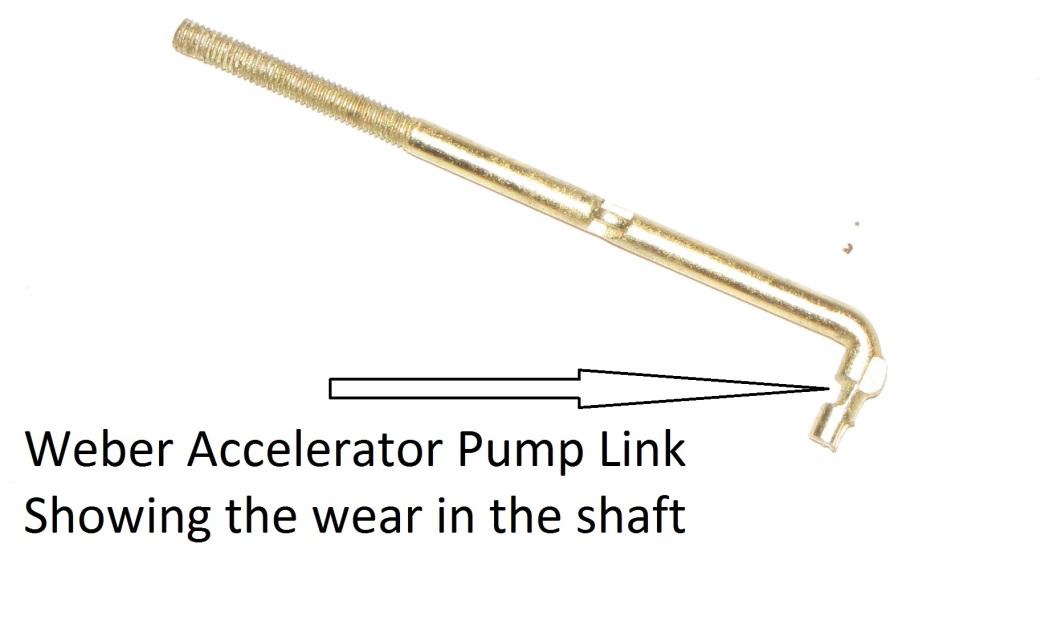
On a high mileage carburetor we will often run into more significant wear problems that can cause a number of running issues. Worn accelerator pump parts will mean that the system will no longer deliver the correct amount of fuel to the engine and can also have a delayed response as the wear in the shafts and pivots needs to be taken up before fuel
can be injected. Worn throttle shafts, throttle balls and linkages can result in uneven running at part throttle due to the carburetors not being balanced when the engine is accelerated, with can lead to popping and back fires as half the engine is getting more or less throttle opening. Fuel leaks from accelerator pump gaskets and fuel fittings, some of which can be repaired on the vehicle, but should cause us to look harder at the rest of the carburetor before making a decision how to repair them. Fuel leaking out of the throttle shafts is another area where people have concern, as I said earlier the throttle shaft bushings are not a fuel tight seal nor do they need to be. If you notice fuel leaking from the shafts then it is from one of a few problems, the most common is the fuel percolating though the carburetor when the engine is shut off. After running the car for a while and then shutting the engine off the engine temperature will bleed into the intake system, causing the fuel in the fuel bowls to boil off and overflow into the carburetor throat. When the fuel hits the closed throttle plate it will run along the throttle shaft and leak out of the carburetor. We can help stop this by using an intake phenolic insulator to reduce the temperature bleeding off into the intake system. Another way that fuel can leak out of the throttle shafts is a sticking needle and seat or excess fuel pressure. Either one of these problems will cause fuel to flow into the throat of the carburetor and then out the throttle shafts. Lastly if you work the throttles with the engine off fuel from the accelerator pump circuit will also come out of the throttle shaft area, though not as much as the other problems will cause.
No matter what type of carburetor system you have, correct maintenance procedures are the key to keeping the car running well. Lubricate all of the pivot points on a regular basis, keep the air filters and fuel filters cleaned and changed on a regular basis. If you plan to store the car over the winter remember completely fill the gas tank and use a fuel stabilizer, run the car for a few miles before you park it to make sure the stabilizer gets though the lines and into
the carburetors. When tuning the car make small movements with the mixture and idle screws, and listen for the smallest change in engine note when doing so. Anyone can tune a set of carburetors, but it takes time and experience to do it well. When a problem arises stop and think; what is it doing? When is the problem happening? What changed to make the problem occur? With a good understanding of how a carburetor works you can solve any of its problems. If you are stuck we are here to help.
Written by
Kurt Donohoe
www.partsklassik.com